|
|
Computerized Shutter Control of Canon DSLRsImportant UpdatesJoe Zeglinski has developed a variant of the control cable design for Nikon DSLR Cameras. This simple modification enables existing shutter control software to support Nikon DSLRs in addition to Canon ones. As a bonus the modification also allows the use of the Canon hand-held TC-80N3 timer controller with Nikon cameras. The latest Canon DSLRs have finally been enhanced to enable computer control of long exposures via USB. Shutter control cables should now only be strictly necessary for earlier models. The newer DSLRs can also be used with the control cables, but this should only be required where the software you wish to use has not been updated to support USB-based control. The popular ImagesPlus astrophotography software has been updated to support USB-based control, but you will need to check the other individual software packages list below. The TC-80N3 hack detailed below for intervalometer support with consumer range DSLRs is still relevant for the newer models. Canon DSLR models that require the control cable for computer control of long exposures include: EOS 300D/Rebel, 350D/XT, 400D/Xti, 10D, 20D, 20Da, 30D, 5D, 1D, 1Ds, 1D MkII, and 1Ds MkII. Canon DSLRs including, and later than, the following incorporate USB-based long exposure control: 1000D/XS, 450D/XSi, 500D/T1i, 40D, 50D, 5D MkII, 1D MkIII. While we are on this subject - other features that Canon could easily add software support for include dark frame exposures (ability to take a shot with the shutter closed), built-in intervalometer with support for long exposures, and lens focus control via the SDK. These would be incredibly useful for astrophotography... IntroductionThe following describes the design and construction of serial port based cables for shutter control of Canon digital SLRs. The motivation behind the development of the cables was to support the use of Canon DSLRs for astrophotography applications - the key requirement here being to support long exposures, typically in the 1 to 10 minute range. Control of these cameras via their built-in USB port unfortunately, and short-sightedly, limits exposures to a maximum of 30 seconds. Note that this cable doesn't replace the need for the DSLR's USB port to be connected, as that is still required for computer control of the camera's settings, image downloading, and computer assisted focusing support. The serial cable only provides computerized control of the camera's shutter release. The alternative approach to computerized shutter control is the use of traditional camera remote switches (AKA cable releases). Note that Canon DSLRs use one of two main types of remote switch socket - a standard 2.5mm socket used by Canon's consumer range of DSLRs (300D, 350D, 400D, Digital Rebels, Kiss, etc), and the proprietary "N3" connector used by the "prosumer" & professional ranges (10D, 20D, 30D, 5D, 1D, 1Ds, etc). The Canon RS-60E3 manual remote switch can be used with the consumer range, and Canon RS-80N3 manual remote switch and TC-80N3 timer controller can be used with the prosumer & professional ranges. The manual remote switches are essentially useless for long exposure astrophotography, the timer controller however is an excellent, albeit relatively expensive, gizmo that can automatically take a series of long exposures. It is a good choice for people that want to travel light and avoid the use of a computer in the field. Its also a useful tool for timelapse photography. The timer controller can be converted to use with the 2.5mm based consumer range by either modifying the cable as shown below, or by puchasing an N3 to 2.5mm converter cable. For astrophotography the use of a computer to control all aspects of the DSLR, including long exposures, is generally the superior approach. It allows for complete software control and automation of exposure runs, and in particular it enables the direct downloading of each long exposure to the attached computer. The immediate access to the images enables you to track the progress of the ongoing exposure sequence, providing constant feedback on exposure levels, focus, tracking, seeing, and so on. There are some additional minor advantages such as no storage limitions due to memory card size, and a slight reduction in internal heat build-up if the memory card is not used. Virtually all the DSLR astrophotos you see on this site have been made using a serial shutter control cable. An alternative approach to shutter control using the serial port is use of a parallel port based design, however the serial port approach provides several advantages:
The control circuits, their schematics, and the following details are all public domain, feel free to copy and use as you see fit. Please note however that there is absolutely no warranty provided or implied, you build and use these cables with your camera at your own risk. The Basic CircuitThis basic circuit was the initial serial port based design. Its the simplest circuit to understand and build, but has been largely superceeded in general use by the superior opto-isolated and LED designs described further down. All of the designs discussed on this page follow a standardized useage of the RS232 serial pins and are fully software compatible. The basic circuit design is very similar to the older parallel port DSLR control circuit, but with the addition of an extra diode to cope with the serial port signal going negative. The 2N3904 transistor is rated to handle up to 6V backwards across the base emitter junction, as serial ports are capable of providing 12V, some protection is necessary. Putting a diode across the base-emitter junction will limit the voltage to the forward voltage of the diode (about 0.7V for a standard silicon diode). If a slightly more robust transistor was chosen it would be quite possible to leave the diode out altogether. 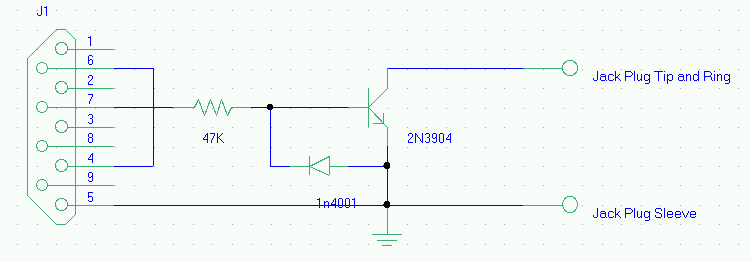
In the basic circuit diagram above both tip and ring of the jack plug are linked, however only the tip is actually required to be connected.
If you have an older PC with the larger D25 type serial connector, then use the D25's pin 4 instead of the D9's pin 7 for RTS, and connect D25 pin 6 (DTR) to D25 pin 20 (DSR). D25 pin 7 is signal ground. Alternative circuit designs from the one above are certainly possible, and as long as they use RTS for shutter control, and connect DSR to DTR for cable detect, they should be fully software compatible.
These parts should be readily available from all major electronic catalogues, and your local Radio Shack in the US, or Maplins Electronics in the UK. Global Online electronic retailers include RS Electronics and Digi-Key. The circuit is very compact and with a modicum of effort can be made to fit completely inside the shell of the 9 pin D. To make your life easier try and find one that provides as much internal space as possible. 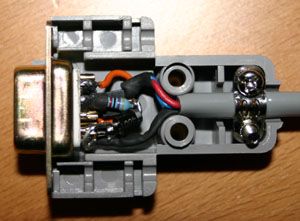
The complete circuit nestled inside the D9 shell Camera ConnectionConnecting the serial control cable to Canon consumer range DSLRs is straightforward as these cameras use standard 2.5mm stereo sockets. Connecting the control cable to Canon prosumer/professional DSLRs is more of a problem however as these use a proprietary "N3" type socket. One way to source an N3 connector for the control cable is to cut off the N3 plug and a short length of cable from an N3 type remote switch, placing a 2.5mm socket on the N3 cable end, and 2.5mm jacks on both the serial control cable and the remaining cable connected to the cable release. This allows you to mate the N3 connector with either the serial control cable or the manual cable release. RS-80N3 wiring: red = shutter (tip in diagram), white = half-press (ring in diagram), bare wire = ground (jack plug sleeve in diagram). TC-80N3 wiring: red = shutter, yellow = half-press, bare wire = ground. Experience has shown that some RS-80N3s have the above colour coding swapped around for half-press and ground. It's therefore a sensible move to check the wires with a multimeter to confirm exactly which colour corresponds to which pin. Wade Calvert provided a N3 pin diagram that can help in this process. 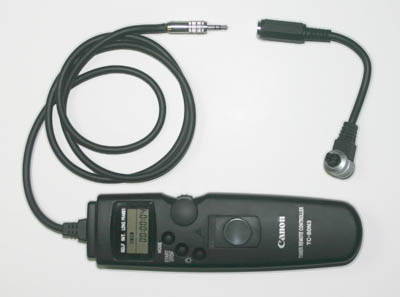
Hacked Canon TC80-N3 Perhaps the easiest way to connect to an N3 type camera is to purchase a third party remote switch with a "synchronization" or "extension" socket. You can plug a 2.5mm jack based serial control cable into this socket, and then connect the remote switch's N3 plug into the camera. The control cable will then be able to fire the shutter on the N3 based camera. I purchased an "ADIDT M1 C3" for this purpose which has worked well. These are available from ebay and other sources for around £6/€10/US$12 + postage. John Deriso notes that the Nova Photography RS80N3 compatible Remote Switch also has an "extension socket" that can be used for this purpose. The switch looks to be higher build quality than the ADIDT and has a locking N3 connector. Available on ebay at around £13/€19/US$25 + postage. As these third party remote switches are relatively cheap you could also just use them as a donor source for the N3 plug and have a simpler and more robust overall cabling arrangement. 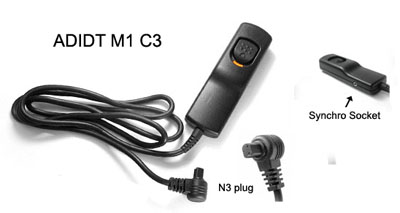
The ADIDT M1 C3 with Synchro Socket Alternative descriptions of the basic circuit
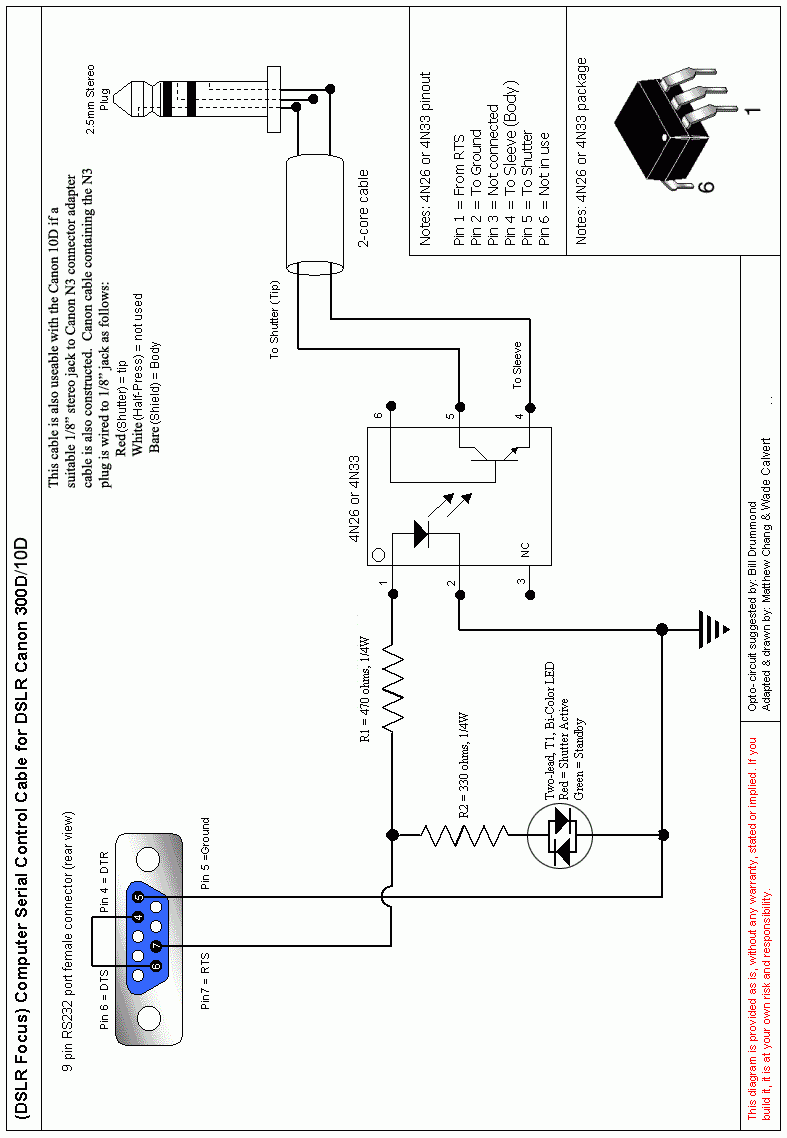
Opto-Isolated Circuit DesignsDepending on your electronics skills, these designs are perhaps only marginally more difficult than the basic circuits above, but provide a higher degree of protection by electrically isolating the camera from the computer. As a bonus they can also incorporate LED based status indication of the current state of the shutter control signal - which is very helpful in troubleshooting any serial port/software connectivity issues. After the original basic circuit design was in use, Bill Drummond and Doc G suggested an alternative opto-isolator that would be a better way to drive this sort of circuit. A simple reed relay could also be used in a similar fashion. Bill proposed a draft circuit using an opto-isolator, which was then brought into reality with Matthew Chang's circuit design and implementation. This was based on Bill's draft design but used an alternative but compatible member of the 4N2x-3x opto-isolator family. It also added a couple of LEDs to show the current shutter state. Pictures of Matthew's circuit inside the D9 shell and the finished article (only one LED actually fitted due to space limitations). Wade Calvert then tweaked Matthew's design to use a single bi-colour LED to help fit the entire opto-isolated circuit into the confines of a D9 serial clamshell.
Wade used a 4N33 opto-isolator in his implementation, although a 4N26, as used in Matthews, or 4N25, or H11A1 should be able to be used interchangeably with it. You can find the parts listed in almost any of the larger electronics catalogs. Digi-Key stocks both the opto-isolator (enter part number 4N33-ND) and the T-1 size bi-color LED (part number MV6461A-ND). In the US, Mouser Electronics stocks the LED (part number 604-L937EGW), and in the UK Maplin Electronics also stocks the LED. The opto-isolator will cost around €/US$0.50/£0.29, and the bi-colour LED around €/US$0.36/£0.23. The picture below shows the circuit squeezed into the D9 shell. It uses the "dead bug" wiring technique where the opto-isolator IC chip is glued upside down to the connector shell. Epoxy glue such as E6000 or similar is ideal. The leads point upwards, and are soldered to directly. Be careful to to use the correct pin numbers, as it can be confusing when the chip is upside down. This method eliminates the need for a circuit board and helps everything fit within the confines of a D9 shell. The T-1 size (3mm diameter) red/green LED is a little hard to see in the picture below as it is clear plastic when not lit. 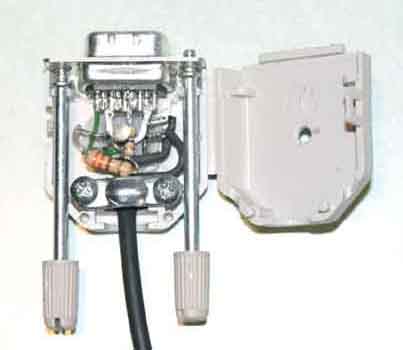
The opto-isolated circuit with LED crammed into a D9 shell
USB to Serial ConvertersThe serial cables have been used successfully both directly connected to a PC's serial port, and via the PC's USB port using USB to serial converters. If necessary you can use a USB hub to expand the number of USB ports available on your PC. Fixing a hub to the telescope mount can be a convenient way to manage your cabling. A single USB connection back to the computer is all that is then required, with the various camera USB, and USB serial converters for camera and mount control connected to the hub. At the time of writing the following USB to Serial converters are known to work:
It is believed that the majority of USB to Serial converters should work with these serial control cables. If a converter is based on the Prolific USB to Serial Bridge Controller you should be very confident it will work OK. I have only received one report of an incompatible USB adapter, an IOGEAR USB to Serial/PDA Converter Cable (GUC232A). Please let me know if you find any converter that appears to be incompatible. 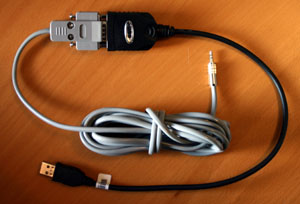
Serial control cable attached to USB to Serial Adapter SoftwareMany astrophotography software packages now incorporate support for the serial control cable standard:
General usage notesNote that you should ensure that the camera is turned off when booting a PC with the cable already connected between the PC and camera, or when plugging in a USB to serial converter that is already connected to the camera - otherwise a harmless ~1-2 second pulse on the shutter control line will cause one or two shots to be fired off. This behaviour appears to be due to Windows scanning for serial port connected plug and play devices. (this actually turns out to be useful in automatically clearing "no memory card inserted" messages from the camera, that would otherwise require you to press the camera shutter button ;) Also note that if your are unfortunate enough to have a PC that defaults its RTS signal to high, the camera can fire continously when the serial cable is connected to it. To avoid this simply wait until your focus/capture program has connected to and reset the port, either before connecting the serial cable to the camera, or before turning the camera on. Low level software shutter controlLow-level software control is very straightforward. Application control of the shutter is achieved by simply asserting the serial port's RTS line to open the camera shutter, and de-asserting it to close the shutter. DTR and DSR are linked and therefore provide a simple way for software to autodetect that a cable is connected to the computer - by asserting and de-asserting DTR and seeing a corresponding rise and fall on the DSR input. This serves as a useful sanity check that the cable is actually connected, and that user correctly identified the correct com port (not all software implements the cable detect feature). Commercial Shutter Control CablesYou can purchase ready-made compatible serial port shutter control cables from a number of sources. These include:
AlternativesThere are a number of alternative designs for standalone timer controllers, and USB based shutter controllers. Note that some of the USB designs are only supported by a limited subset, if any, of the software listed above.
Advice and HelpI proposed the RS232 shutter control signal interface standard and generally acted as cheerleader for this project, but I am not an electronics expert. If you have any questions related to electronic aspects of building a serial shutter control cable, the Yahoo! Groups dslrfocus forum has proven to be a useful source of advice and help. You might also try the popular DSLR astrophotography Digital Astro forum. AcknowledgementsKudos and Thanks to my friend Tim Morley who worked with me on the project, helped determine it was feasible, and was responsible for the all-important original Basic Circuit design and the text above describing it. De facto standardization of the interface, dropped clangers retrieved, and the different circuit designs have evolved thanks to the input and support of the pioneering DSLR software authors - Chris Venter, Mike Unsold and Steve Bryson; and members of the wider DSLR imaging community, in particular Bill Drummond, Doc G, Stephano, Matthew Chang, Wade Calvert, Ahijado, John Deriso, and Joe Zeglinski. Mail with any changes or additions. |
||||||||||||||||||||||||||||||||||
| Site contents and all images are Copyright © Paul Beskeen |
